most likely in the course of a business activity. If you do not want to receive any more mailings, unsubscribe.
Owner Builder Network®
7102 FM 1488
Magnolia, TX 77354
(across from Dominoes)
(281) 356-9050
The Lazy EngineerWANTED: A NEW JOB DESCRIPTION FOR AN OLD PROFESSIONSource: Professional Builder
Waste in product is huge yet pales in comparison to waste in process, although the latter is tougher to measure. In the August column, we homed in on VPOs (variance purchase orders, aka EPO or FPO), anything done after the initial bids and contracts for a house, as among the worst sources of the margin loss nightmare. Measurement is tricky here because everyone assumes the baseline denominator in a variance calculation is solid, both mathematically and ethically. Are you sure? You can quickly make your variance number drop dramatically if you just gross up the original cost estimates and put more dollars in allowances for losses and replacements, theft, or winter conditions among other handy "cost dumps." Who among us hasn't played the "Where do I stick this cost so no one will notice and it won't increase my variance" game? Only once or twice, right? Do you think your people might be compelled to do the same? All that aside, if you do everything it takes to cut true variance to a bare minimum based on rock-solid initial estimates and calculated allowances, you will have to do so many other things right that everything improves, including the bottom line. I began writing this month's feature with the intent to address measurement of these processed to better learn from them, because that's something we don't do well in home building. I decided, however, that we are not quite ready for that, and it's best to first spend more time convincing you of the magnitude of the issue by examining additional areas of loss. If we can get sufficiently agitated over these causes or margin depletion, maybe I can convince you to take a hard look at our measurements. It so happened that a couple of weeks ago I was with a builder and while walking houses I had no trouble pointing out considerable issues in framing waste. Some were commonly seen local framing traditions, such as excess cripples, kings, jacks, and the ubiquitous non-bearing header over a firebox. Other, however, were clearly sourced in the engineering of the house. This, to put it mildly, makes me completely crazy, and when I see it, it is hard to stay calm. In one unit particularly festooned with excess beams and seriously redundant shear provisions, we pulled out the plans and had a look. After a 10-minute review and discussion, I asked the VP of construction how he'd describe what he saw. He looked disgusted, threw up his hands, shook his head, and uttered. "Lazy engineering!" Nods all around the room. Is that too harsh? Do we have a lot of lazy engineers scattered around our industry who are costing us considerable time, materials, and labor, wasting our precious margins? The only cold-hearted, no-tears, just-the-facts-ma'am response based on the evidence is a resounding "Yes!" My colleagues and I have collected literally thousands of pictures of lazy engineering and have some specific recommendations for you to combat this problem, but let's first delve into a few examples from around North America. As we do, make notes on some of your own that will no doubt come to mind. TENNESSEE Entering the two-car garage of this house, I looked up to see two massive 16-foot beams running left to right, about 6 feet in, supported by a sandwich of 10 2X4s on each end. Beyond them were I-joists spaced at about 16 inches all the way to the back wall, supported on both ends by joist hangers. From the beams coming back to the garage door opening were four double trusses, easily carrying the weight of the gable above, yet the garage door opening was framed with two 12-inch lam-beams with supporting posts far beyond what any possible shear requirements would specify. My questioning look was met with a curious explanation. This home offered an optional storage area above the garage. It could be floored out and walled in with access from an upstairs hallway. The engineer provided plans to build this with the options selected, but none without. Yet only 10 percent of customers chose the option. Even if one did, the structure was easily more than double than that required by code. The bottom line was, for 90 percent of these homes, the waste bill ran to more than $2,000 as the entire garage roof structure could be done with trusses alone without either set of lam-beams, eliminating all I-joist, joist hangers, supporting posts, etc. Even for those homes with the bonus room, there was at least $1,000 in waste with over-spec'd lam-beams, I-joist over-sized and too close together, using joist hangers instead of ledger boards, and excess supporting frame members. Everything was built exactly according to the engineering specifications. Someone was sleeping on the job. MARYLAND As I walked a large two-story house with an open floor plan, I stopped to stare at a long wall that I could not quite figure out. The wall in question spanned the great room, dining nook, and kitchen, and was nearly 40 feet long and full of windows and sliders. Each opening was capped with 2X12 sandwiched headers and supported with a riot of king and jack studs and a circus of cripples - as usual, far more than needed. Yes, it held up the second floor, with the overbuilding that is pretty much standard procedure across the U.S. and Canada. But hold on a minute. Two feet back for the entire length of the wall ran massive, tripled-up 2X12 lam-beams, supported at key points by stem walls popping out at the kitchen and nook breaks. What was this? One of these structural systems, either the wall or the beams, was unnecessary, and there was well over $1,000 in labor and material in each. It took me a minute, but after stepping out onto the deck to check, the answer was clear. The back wall of the house had been kicked out 2 feet, but just on the first floor. The massive lam-beam structure was holding up the second floor, not the back wall. The client explained this was a standard option for this plan that was added a couple of years back. The extra space was covered by a small shed roof with tiny triangular trusses. Without the kick-out option, there was way too much structure provided for the load. With it, the entire back wall had virtually no weight on it and could have been ladder-framed, saving more that $1,000. Each was built according to the drawings, but neither the lumber supplier nor the engineer said a word. Lazy. ONTARIO I had never seen so much steel in a house before. Not just in the basement, but also on the first floor. And all of it was going to be framed out and wrapped in drywall. These were straight-forward two-story homes, and after walking thousands in my career, I concluded with 100 percent confidence the expensive steel could be replaced with less expensive wood products. And who has more wood resources than Canada? My sincere queries got the tepid response, "We build them like the engineer specs them." "Do you ever challenge them, question them?" I asked. Everyone hemmed and hawed until the purchasing manager spoke up: "Well, we aren't' engineers, and whenever we ask them about something they are quick to remind of us of that and see how many times they can use the word 'liability' in the same sentence." Sigh. More engineering laziness. Time to rebid the engineering - with a more strongly written scope of work and hiring criteria. TEXAS The lean session with the foundation contractor finished up, and he was dynamite. He showed the builder more than $1,000 of savings per unit by changing the depth of beams and number of cables in their post-tension slabs while still meeting code requirements. Everyone was excited, but I noticed the young COO with a very pained look on his face. "You should be happy!" I suggested. "That could exceed a million bucks savings this year." "Yeah ... just give me a day to get over the $5 million we buried in the ground since I came on board." The cause" If you guessed "lazy engineering with a dose of CYA" you are right on target. The foundation contractor was building to the exact specifications provided and gave quite a speech on the problem with engineers who don't listen and never, ever come out to the jobsite. Lazy? His description was more like "indolent." BUT ... BUT ... BUT... I don't know what to call these examples and few thousand others except "lazy engineering." If it takes hurt feelings and heated calls or emails to get the conversation going, that's quite all right. There is a small minority of engineers that will read this and think, "Yes, this is exactly what happens. I see an opportunity. Let's fix it." The majority, though, will want my hide and, in their defense, they have some valid points. There is not a engineer anywhere who cannot tell endless stories of builder who simply do not want to pay for thorough, efficient engineering. Guilty as charged. The builders' hang-up is they simply do not understand the cost-value relationship and believe by squeezing $500 from the engineering bid they actually save money. Whose job is it to help the builders understand the numbers? Perhaps the engineers? Could this be an opportunity? Another valid complaint we hear from engineering, not us." There are at least six or eight different suppliers that provide software to lumber and truss dealers for calculating load requirements, and guess what? From what we've seen, they all calculate high. They base their calcs on worst-case assumptions, and who can blame them? So OK, start there, then give it an intensive review and work out all of the excess. We do work with a couple of engineering firms that truly get it, and we have learned much from them. Yet they look at their job quite differently than most. The standard definition of construction engineering goes like this: The branch of science and technology concerned with the design and building of structures. The best engineers we know think of it this way: The branch of science and technology concerned with the efficient design and building of structures that meet or exceed every code at the lowest practical cost. That makes all the difference and, let's be honest, have you every had that specific discussion with your engineer? How will they react if you do? If they don't get it, then you have the wrong engineer. If they claim they get it, it is their obligation to prove it to you - on every house you bid. The definition of the job of engineering needs to change. FEET TO THE FIRE I hope that while reading my examples here, you were thoroughly distracted as many of those on your own sites came to mind. Or maybe you were wondering just how many you have - and are paying for - yet are missing? That question also applies just as much for the engineers out there. Every problem, obstacle, or regulation raised in the path of home builders provides a unique opportunity that few have the guts, smarts, and will to overcome. Most of your competitors are not willing to work that hard, and that can be very good news, provided you are. Meanwhile, empower your staff to challenge the engineers and give them the basic knowledge to do so. Don't accept anything that at least gives the surface appearance of overkill. More often than not, you'll be right. The minimum average savings we have seen from the 200 case studies is $1,200 per house, and that is without going too deep. Being conservative, lets' call it a sure-thing $1,000 per unit this year. Would that make a difference? And remember the point from "grand Theft Home Building": How would you respond if someone were stealing from your bank account? I thought so. |
|||
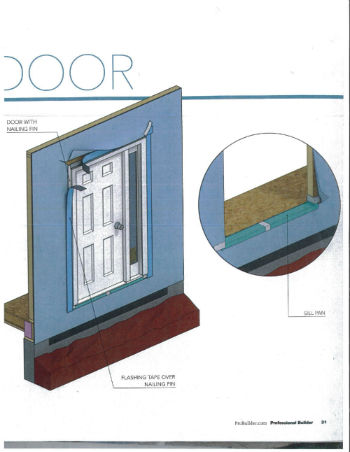
Detailing the DoorHere's How to Make Sure Water Stays OutSource: Professional Builder |
|||
|
Manufacturers have worked hard to encourage proper door flashing, with more installer instruction, better peel-and-stick products, and flanged brickmold doors that are flashed like windows. These days, the best door installers obsess over flashing details. Tailing. Even if the result is just a minor leak, today's high-performance wall systems have less drying potential. This means that small leaks can lead to big problems. Good detailing isn't complicated if you keep some basic principles in mind and pay attention to the problem spots: improper integration of flashing with the drainage plane, doors without sill pans, and missing drip caps over the door. Incorporating a flange or nailing fin on entry and patio doors is becoming more common - for good reason. The flange allows doors to be flashed and integrated with the drainage plane in the same way a flanged window is integrated. But improper sequencing of peel-and-stick flashing is shockingly common, with upside-down laps that rely on the adhesive for long-term waterproofing, a job it's not made for. Flashing, like siding and roofing, must be lapped in order to shed water. |
 |
||
|
Prepping the substrate and rolling the tape into place ensures it will stay put over time. Good long-term adhesion requires that the substrate (the water resistive barrier) be clean and dry, and that the tape be firmly seated during installation. Smoothing the tape into place by hand doesn't create enough seating pressure; it needs to be pressed into place with a rubber J-roller. And water will eventually get past the cladding, at which point the flashing will be called on to keep it out of the structure. Both sill pans and drip caps are crucial for preventing water infiltration. Sill pans were traditionally fabricated from metal, but today there are easier, less expensive options. One is to fabricate the pan from the length of stretchable flashing: Lay the flashing over a piece of bevel siding nailed to the base of the opening to create a drainage slope, and stretch the flashing tape around the corners at the base of the opening. Another option is a three-piece plastic pan. These products include corner pieces with wings that wrap around the sides and bottom of the opening. Be sure to seal the overlaps between the pieces with the manufacturer's recommended adhesive - generic silicone will leak over time. Drip caps are cheap insurance, especially in areas that get wind-driven rain. Many advise installing them on any exterior door unprotected by an overhand, but they should really be used on all exterior doors. Even builders who train their crews on proper flashing techniques may encounter problems. If they subcontract the door installation to the wrong crew; be sure to use crews that have been trained and certifies by the particular door manufacturer. When installing a door with a flange or nailing fin, check for the following key details: Cut the WRB. I-cut the weather resistive barrier at the opening. Fold the sides into the opening and staple them in place. Make diagonal cuts in the WRB at the top of the opening on each side. Fold the flap up and tape it into place. Install the sill pan. If it's a three-piece rigid pan, lay it over three beads of construction adhesive and seal laps between the pieces with the manufacturer's recommended sealant. Hang the door. Install the nailing flanges against the WRB and back-caulk with a quality ASTM C920-compliant sealant. Check that the door is square in the opening. Fasten in place. Apply the tape. Apply flashing tape to the vertical flanges first, extending the tape about 2 inches past the top and bottom of the opening. Install the drip cap at the top of the door and seal the top edge with flashing tape, extending the tape on both sides. Roll the tape firmly into place with a rubber roller. Then fold the WRB flap back down and put tape over the diagonal cuts. |
|||